Braided Cable Knit Mittens
Cozy Braided Cable Knit Mittens: Worsted Weight Yarn + Magic Loop (with Free Pattern & Video Tutorial!)
Looking for your next cozy knitting project? Braided cable knit mittens are a classic winter accessory that combines warmth, texture, and technique. Whether you're new to knitting cables in the round or ready to try magic loop with worsted weight yarn, this post will walk you through the essentials—from yarn choice to reading cable charts—for mittens that impress.
And the best part? There’s a free pattern and a YouTube video tutorial to guide you step-by-step!
Why Choose Braided Cable Knit Mittens?
Braided cables are timeless and beautifully textured. When worked into mittens, they add both style and warmth. They’re also a great way to practice cable knitting skills on a manageable, giftable project.
Magic Loop for Mittens: Why It Works
If you’ve never tried the magic loop method, mittens are a great place to start. Magic loop lets you knit small circumferences in the round using a long circular needle—no need for double-pointed needles.
Benefits of magic loop:
Fewer needle changes = faster knitting
Easy to adjust for fitting
Great for traveling or knitting on-the-go

How to Read a Cable Chart in the Round
Reading a cable chart in the round is different than flat knitting because you're always knitting from the right side.
Here’s what you need to know:
All rows are read from right to left
Symbols represent stitches worked on the right side only
No purl-back rows, so what you see is what you knit
Pro tip: Highlight your cable crosses and stitch repeats in the chart with a highlighter or digital markup to stay on track.
Follow Along with the YouTube Tutorial
If you're more of a visual learner, I’ve got you covered! 🎥
Check out the full video tutorial on YouTube, where I walk you through every step of the process—from casting on with magic loop, to reading the cable chart, and finishing your thumb.
➡️ Watch the Video Tutorial Here
Perfect for beginner-to-intermediate knitters, this video is a great companion to the written pattern.
Gauge
• Ribbing on US 7: 12 sts x 12 rounds = 2” x 2”
• Cable Pattern on US 8: Cable Chart Repeat (20 stitches x 19 rounds) = 3.5” x 2.75”
Size: One Size
• Across Palm Unstretched: 3.5” (8.9 cm)
• Total Length: 9” (22.9 cm)
Materials
• Cable Needle Amazon
• Lykke US 7 Amazon
• Lykke US 8 Amazon
• Tapestry Needle Amazon
• One Stitch Marker Amazon
• Waste yarn to hold the thumb stitches
• 155 yds (142 meters) Worsted/Medium/#4 Weight Yarn
Disclaimer: Some links provided are affiliate links and I receive a small commission when used. These commissions help to support the free content I offer!
Abbreviations Used
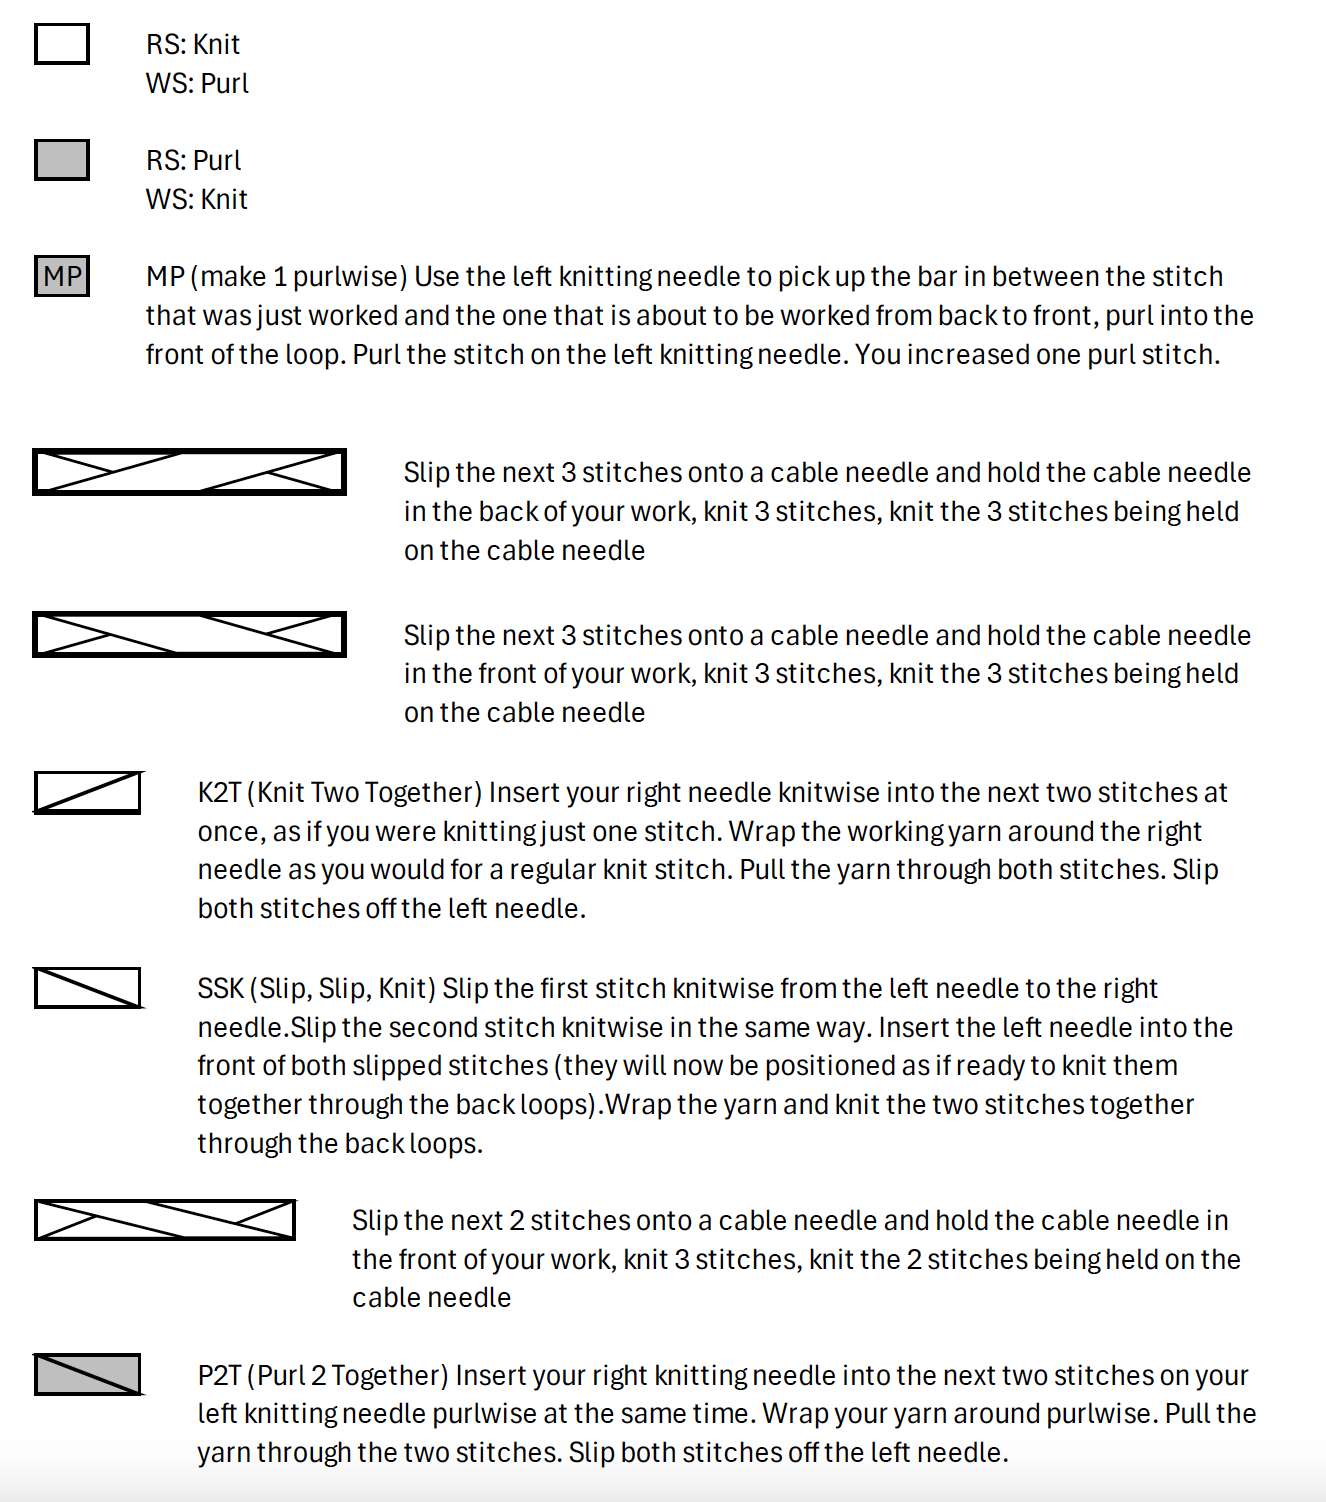
MP (make 1 purlwise) Use the left knitting needle to pick up the bar in between the stitch that was just worked and the one that is about to be worked from back to front, purl into the front of the loop. Purl the stitch on the left knitting needle. You increased one purl stitch.
P2T (Purl 2 Together) Insert your right knitting needle into the next two stitches on your left knitting needle purlwise at the same time. Wrap your yarn around purlwise. Pull the yarn through the two stitches. Slip both stitches off the left needle.
Cast On
Use a stretchy cast on method to cast on 40 stitches to the US 7 circular knitting needles. Divide your stitches in half and prepare to join in the round for magic loop.
Ribbing
Ribbing Round: *Knit 1, Purl 1* repeat between the *s across the round
Continue working the Ribbing Round until your work measures 2.5” (6.4 cm).
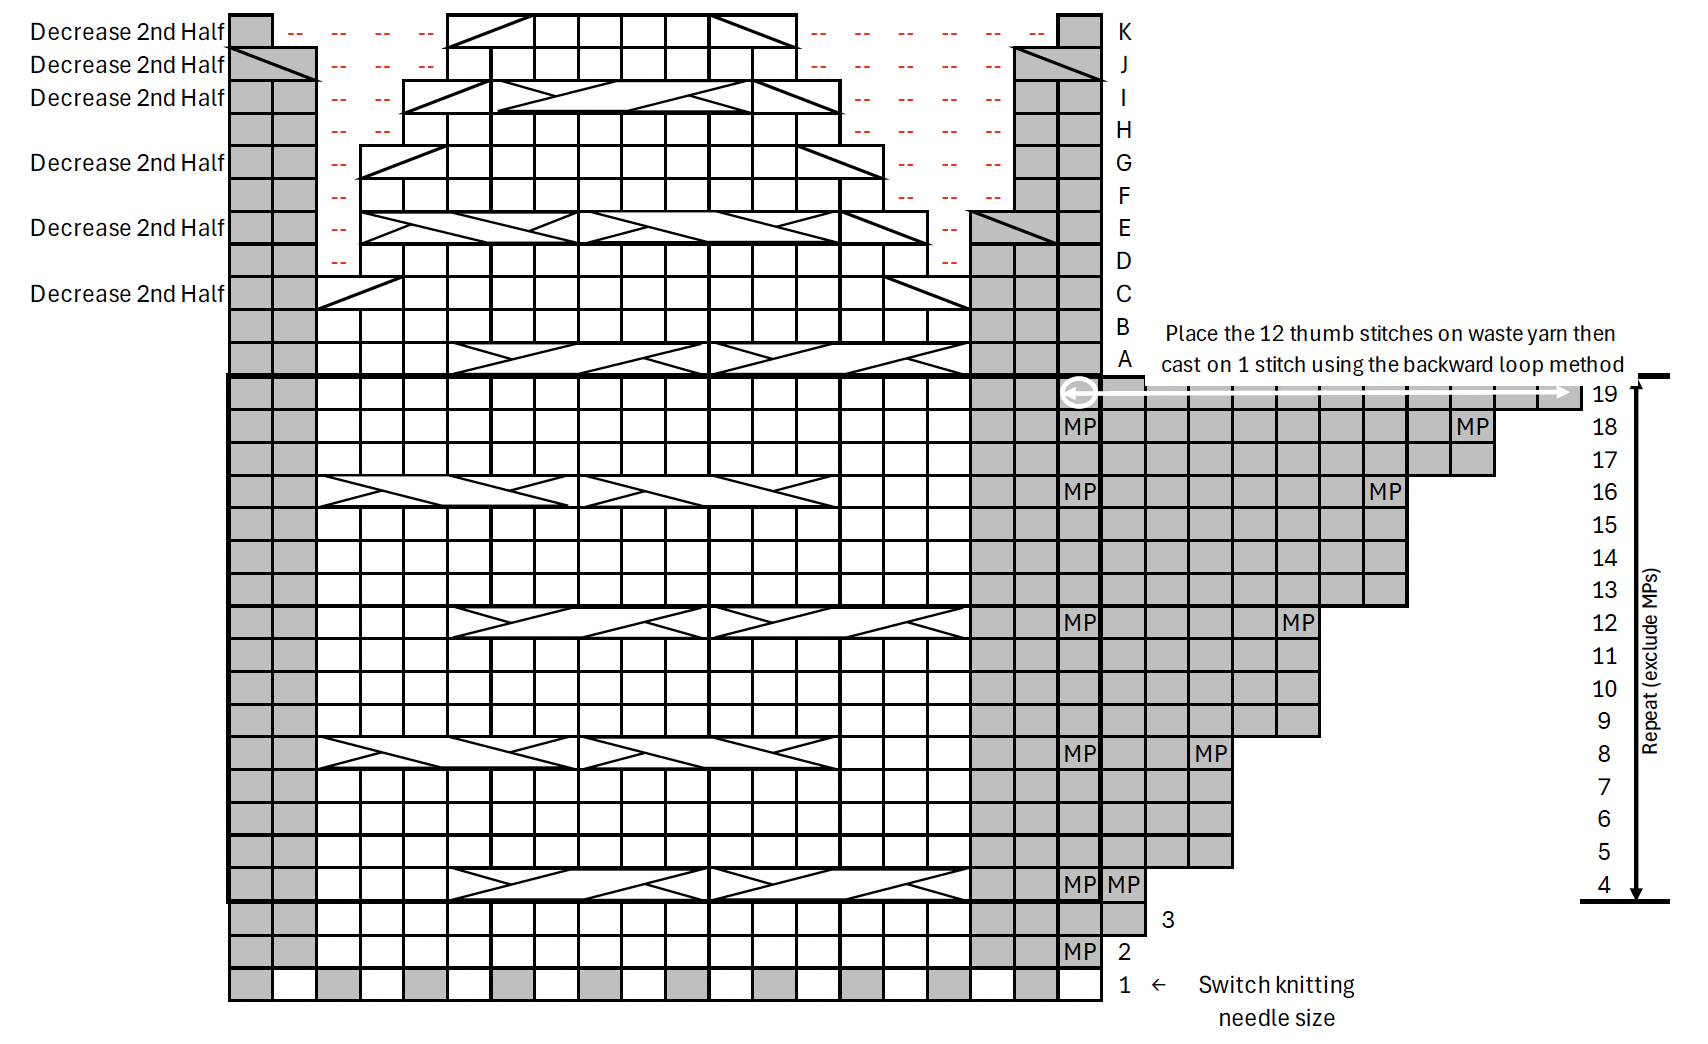
Working the Cable Chart
Two things to note before you begin the cable chart:
(1) You will work the cable chart across the first half of your stitches for each round. The second half of the stitches should be purled!
(2) When working the first row of the cable chart, you will want to switch from your US 7 to US 8 knitting needles.
Work Rounds 1 through 19 one time. Once you place your thumb stitches on waste yarn, work Rounds 4-19 one additional time EXCLUDING THE MPS.
Continue to work Decrease Rounds A - K. For any round that states Decrease 2nd Half work Purl 1, P2T, purl until 3 stitches remain, P2T, Purl 1 across the second half of your stitches.
When you complete Round K, work a Kitchener Stitch bind off.
Kitchener Stitch
Set Up Step 1: Thread the tapestry needle purlwise through the first stitch on the front needle, keep the stitch on the needle
Set Up Step 2: Thread the tapestry needle knitwise through the first stitch on the back needle, leave the stitch on the needle.
Repeat Step 1: Thread the tapestry needle knitwise through the first stitch on the front needle, slide the stitch off of the needle
Repeat Step 2: Thread the tapestry needle purlwise through the new first stitch on the front needle, keep the stitch on the needle
Repeat Step 3: Thread the tapestry needle purlwise through the first stitch on the back needle, slide the stitch off of the needle
Repeat Step 4: Thread the tapestry needle knitwise through the new first stitch on the back needle, leave the stitch on the needle.
Thumb
Pick up the 12 thumb stitches and divide in half to work a magic loop round. As you work the first round (purling all stitches), pick up and P2T two stitches from the gap where the thumb meets the mitten to help close the gap.
Continue purling the 12 thumb stitches until the thumb measures 1.5” (3.8 cm)
Thumb Decrease Round 1: P2T across round
Thumb Decrease Round 2: P2T across round (3 stitches remain)
Cut yarn leaving an 10” tail, use tapestry needle to thread tail through remaining stitches.
Weave in all ends then work the 2nd mitten!
Left Mitten Chart
Right Mitten Chart

Key