Intarsia Heart Fingerless Mittens – Free Knitting Pattern & Video Tutorial
Learn how to knit intarsia colorwork with this heart fingerless mittens knitting pattern, designed to be both beginner-friendly and fun to knit. This pattern is worked flat (with the exception of the thumb) using DK weight yarn, making it a great introduction to intarsia knitting without the stress of knitting in the round.
These cozy fingerless mittens feature a simple heart motif, making them perfect for handmade gifts—whether you’re knitting for a loved one, a friend, or yourself. The mittens are quick to make and ideal for using up small amounts of contrasting yarn colors.
To help you every step of the way, I’ve created a full video tutorial that walks you through the entire process, including how to manage yarn while knitting intarsia, keep your colorwork neat, and finish your mittens cleanly. The free written pattern is available right here on my website!
What You’ll Learn in This Tutorial
How to knit intarsia colorwork step by step
Tips for managing multiple yarn colors
How to knit fingerless mittens flat
How to create a clean heart design in intarsia
Finishing techniques for a polished look
Pattern Details
Skill Level: Beginner to Intermediate
Yarn Weight: DK weight yarn
Construction: Knit flat (thumb knit in the round using magic loop)
Project Type: Fingerless mittens
If you’ve been wanting to learn intarsia knitting or are looking for a thoughtful, handmade gift idea, these heart fingerless mittens are the perfect project to try.
Watch the full video tutorial on YouTube - Linked HERE and above!
Get the free pattern below!
Gauge
Stockinette knit flat on US 6 (4.00mm): 10.5 sts x 14 rows = 2” x 2”
Size: One Size (Adult Medium)
Across Palm Unstretched: 4.75” (12 cm) at widest part with thumb increases included
Total Length: 7” (18 cm)
Materials
Lykke US 5 (3.75 mm) Straight OR Circular Amazon
Lykke US 6 (4.00 mm) Circular Amazon
Tapestry Needle Amazon
Two Stitch Markers Amazon
Waste yarn to hold the thumb stitches
Yarn
Clinton Hill Cashmere Bespoke DK in 2 Colors
Background Color: Shown in Passion Pink and French Grey
95 yds (87 m)
Heart Color: Shown in Winter White
10 yds (9 m)
I purchased this yarn from a local yarn shop: MainLinePurls (not sponsored or affiliate)
Disclaimer: Some links provided are affiliate links and I receive a small commission when used. These commissions help to support the free content I offer!

Abbreviations Used
M1L (make 1 left) Use the left knitting needle to pick up the bar in between the stitch that was just worked and the one that is about to be worked from front to back, knit into the back of the loop. You increased one stitch.
M1R (make 1 right) Use the left knitting needle to pick up the bar in between the stitch that was just worked and the one that is about to be worked from back to front, knit into the front of the loop. You increased one stitch.
Before You Begin
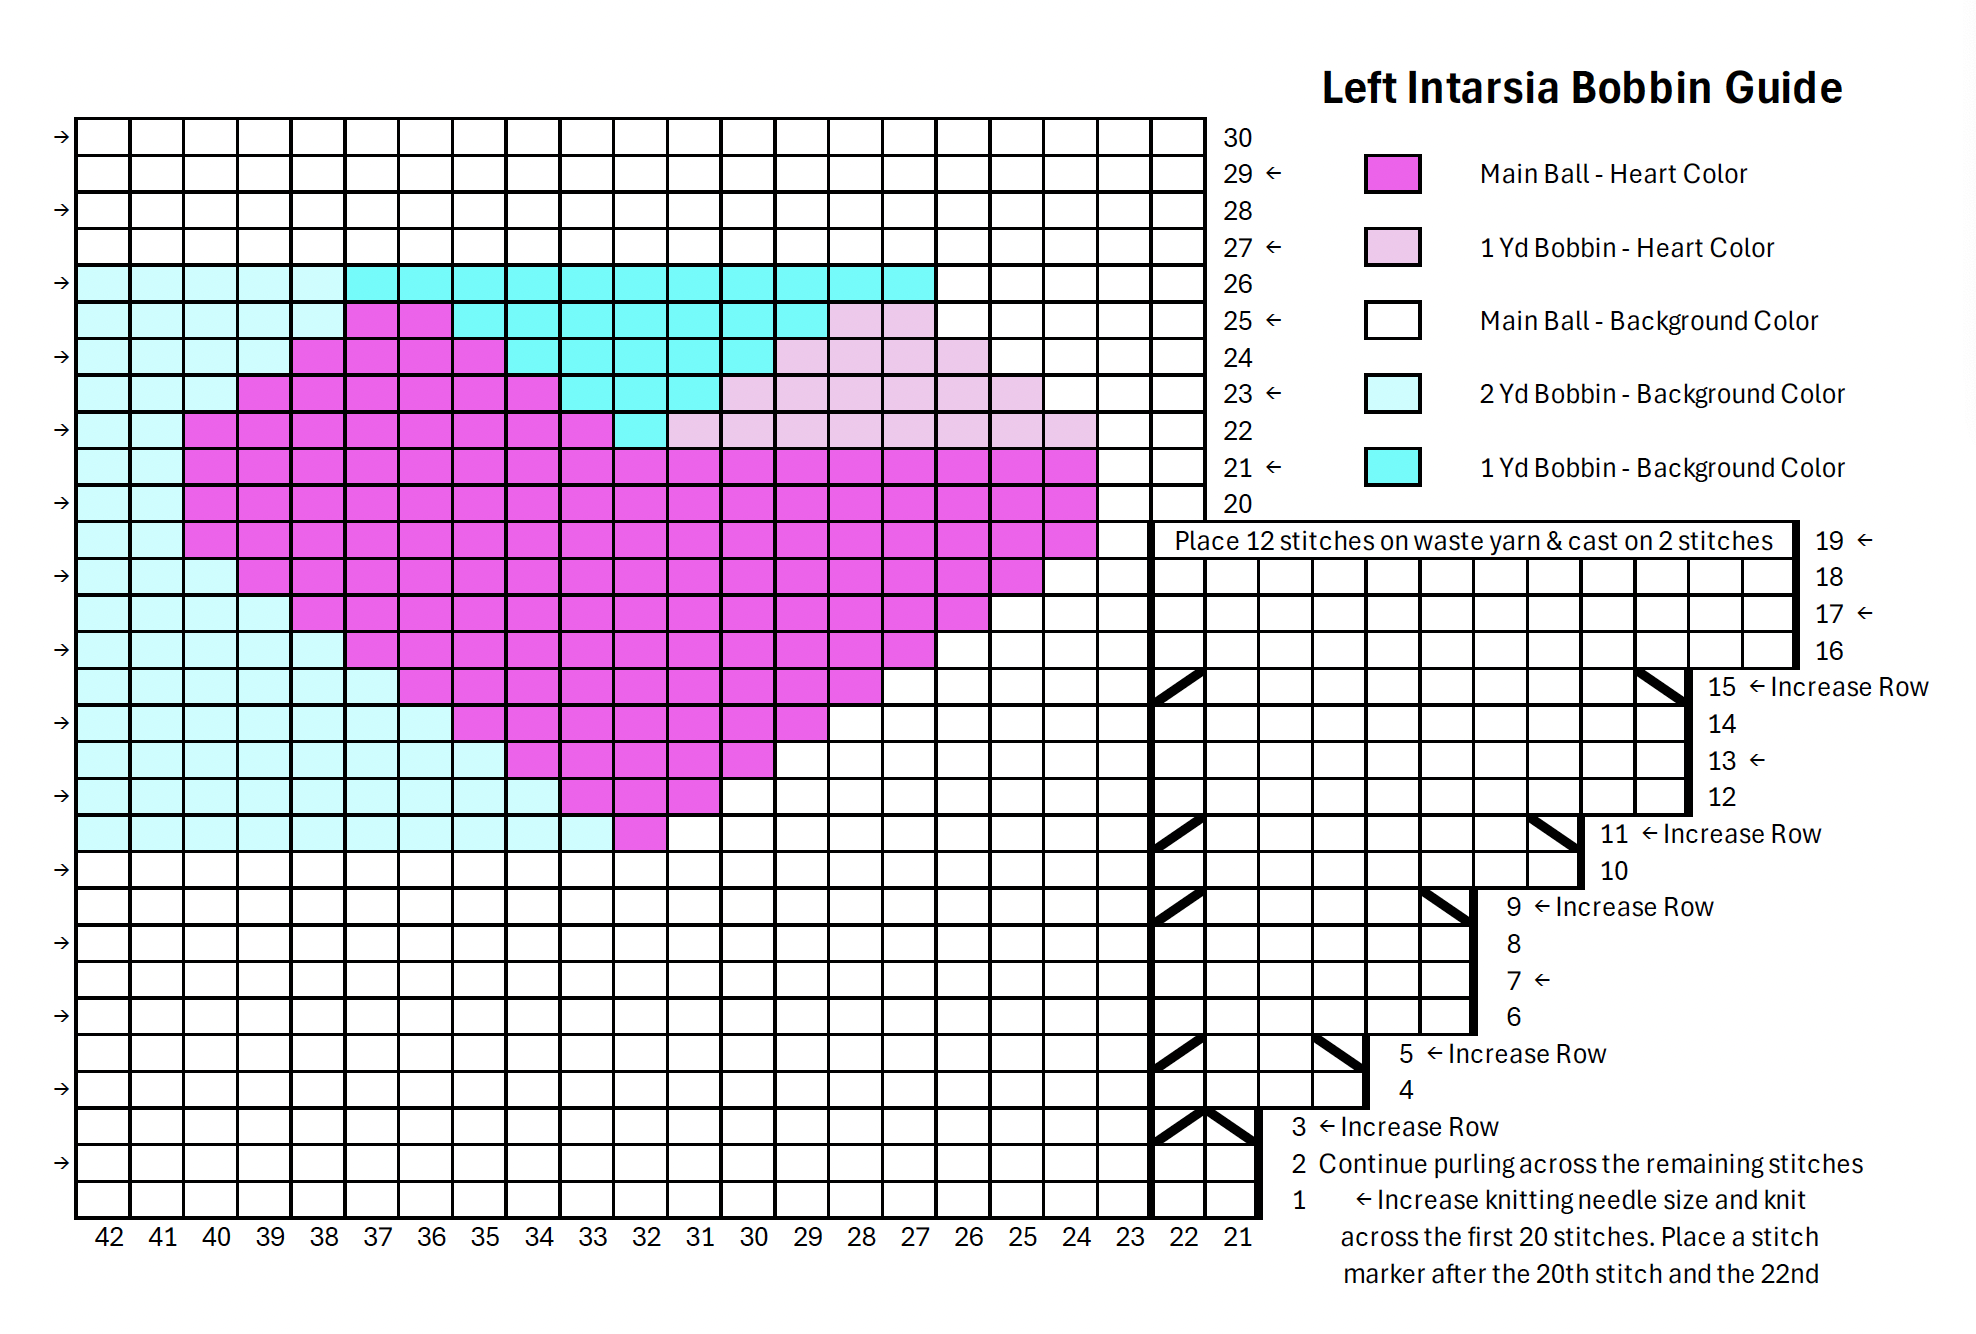
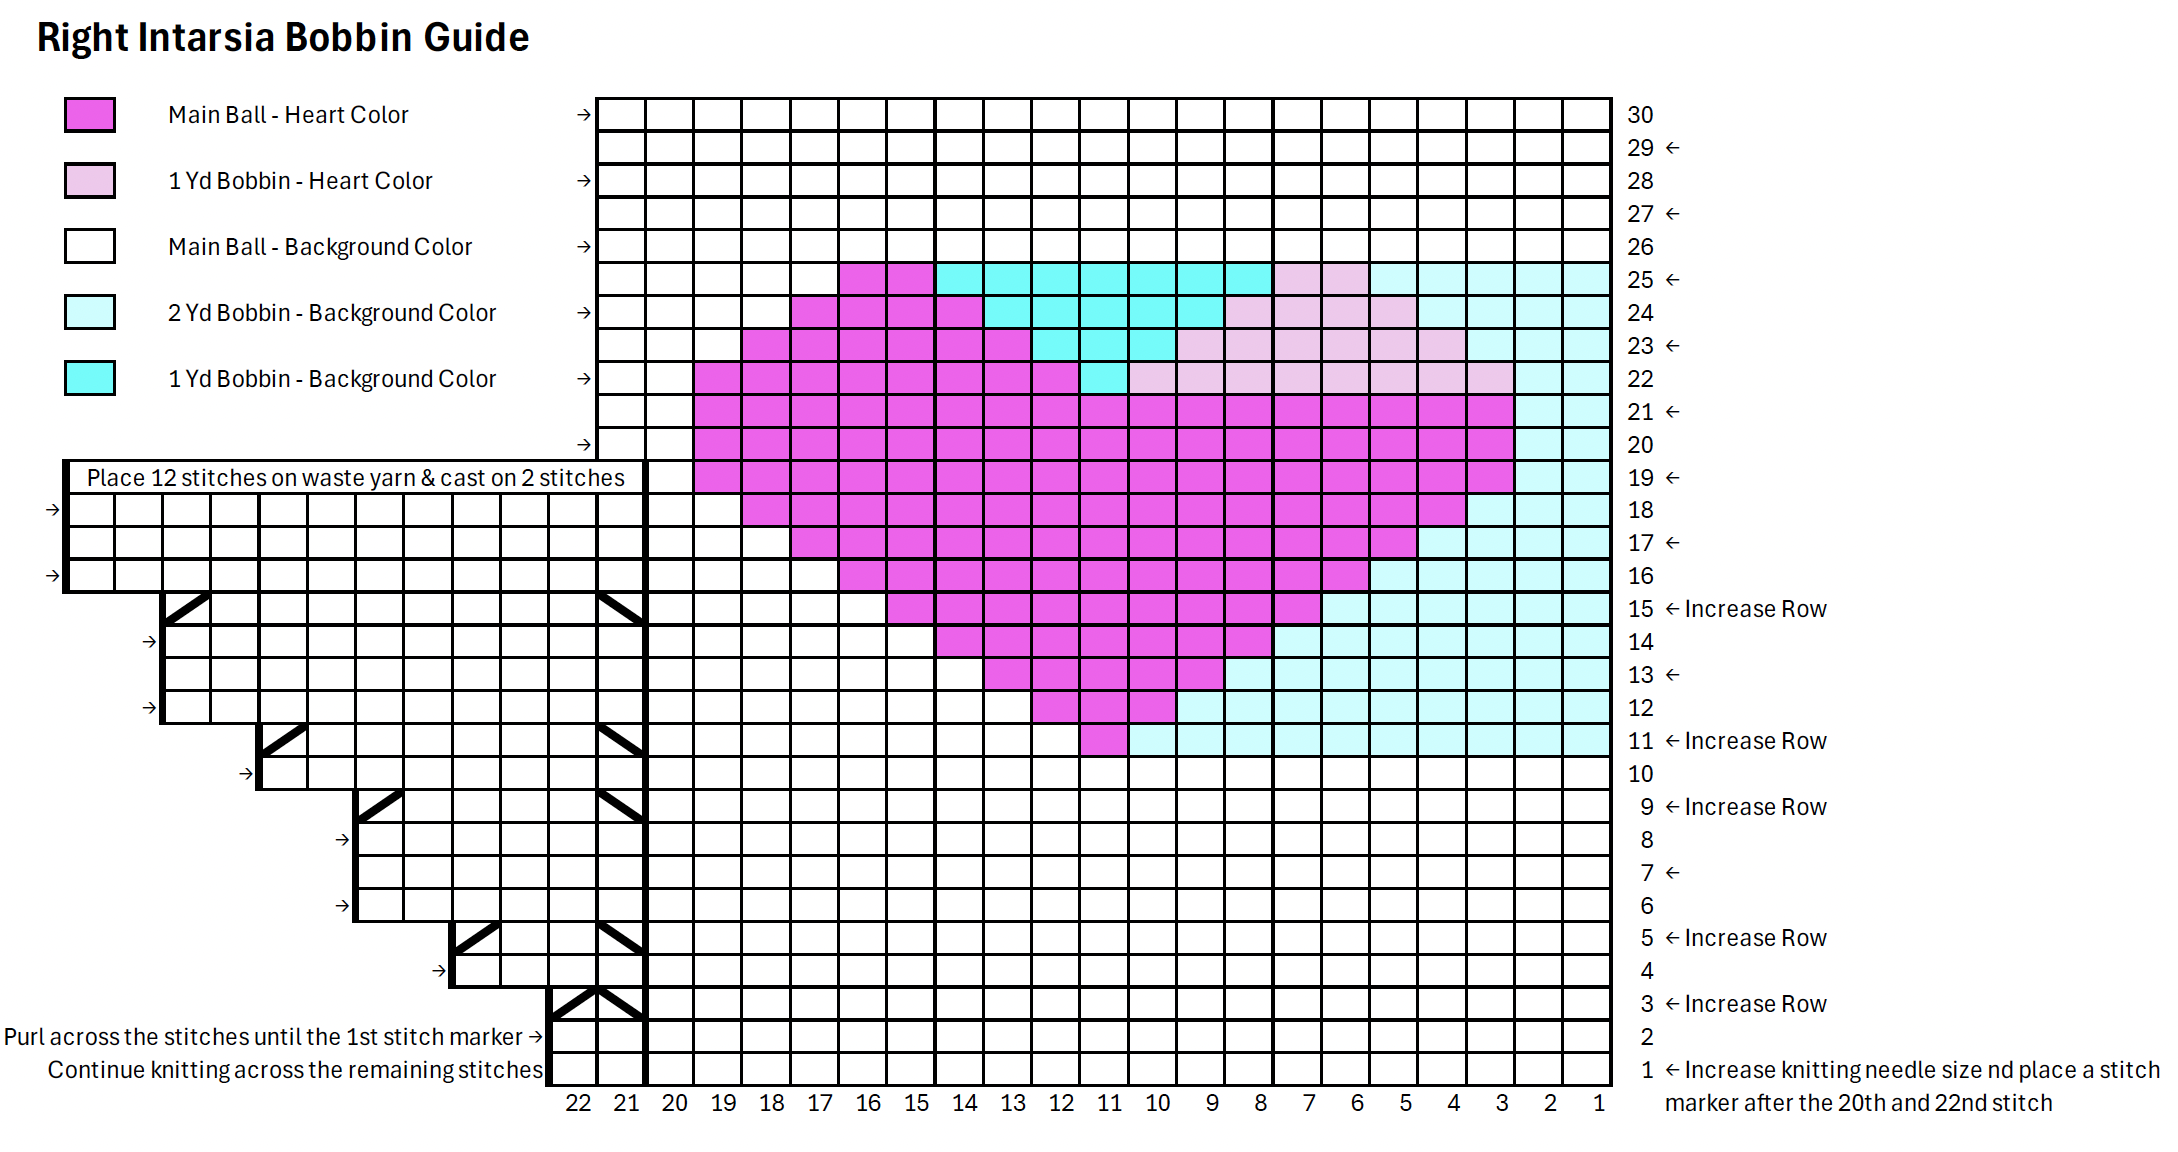
Before you begin knitting, I recommend creating the bobbins you will need for the intarsia. For EACH mitten you will need 3 bobbins total (in addition to your main balls of your heart color and your background color).
1 yard heart color
1 yard background color
2 yards background color
I have included (scroll all the way to the end of the pattern) the color-coded charts for where each ball of yarn vs bobbin is used for the right and left mittens! I also describe where to use each in the YouTube video tutorial.
Cast On
Use a stretchy cast on method to cast on 42 stitches to the US 5 flat or circular knitting needles. This project (excluding the thumb) is knit flat, then seamed.
Ribbing
Ribbing Row: Knit 1, *Knit 1, Purl 1* repeat between the *s across the row until 1 stitch remains, Purl 1
Continue working the Ribbing Row until your work measures 2” (5 cm).
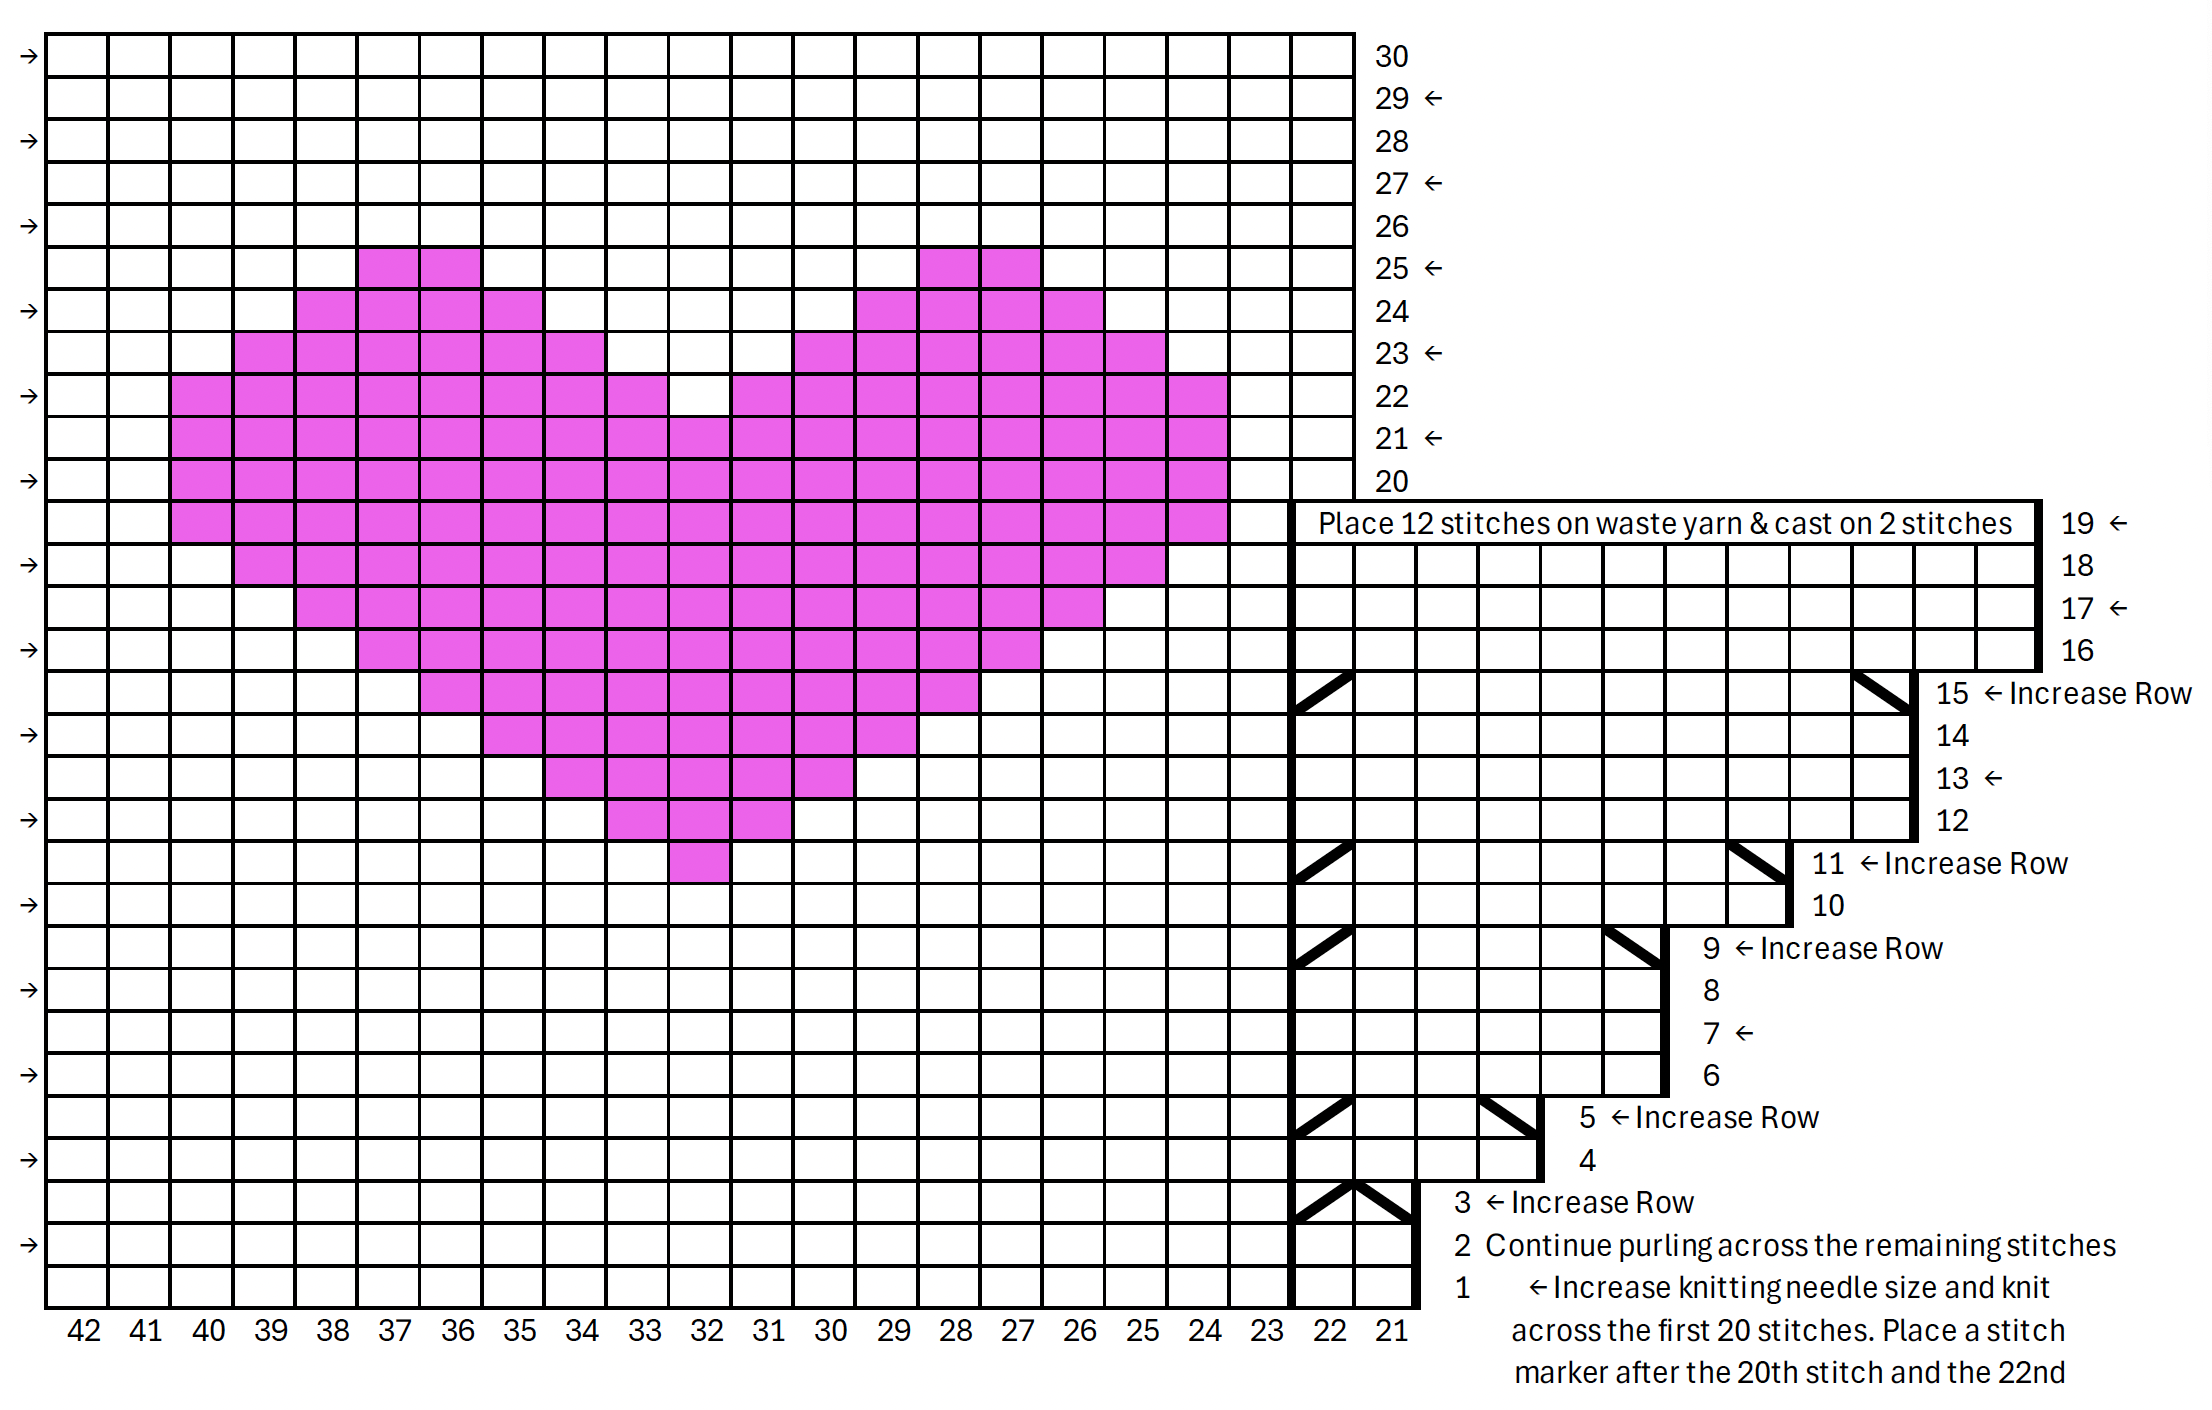
Working the LEFT Chart
Two things to note before you begin the cable chart:
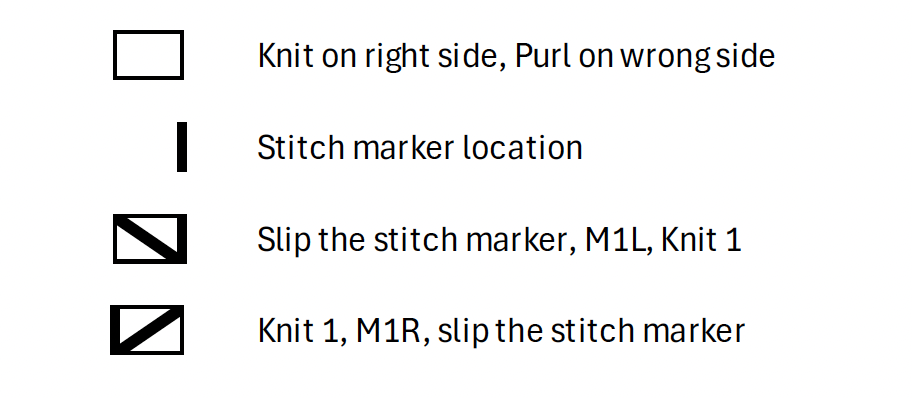
(1) The chart is worked in stockinette - Knit on right side (odd # rows), Purl on wrong side (even # rows)
(2) When working the first row of the cable chart, you will want to switch from your US 5 to US 6 knitting needles and place your two stitch markers to mark where the thumb will go.
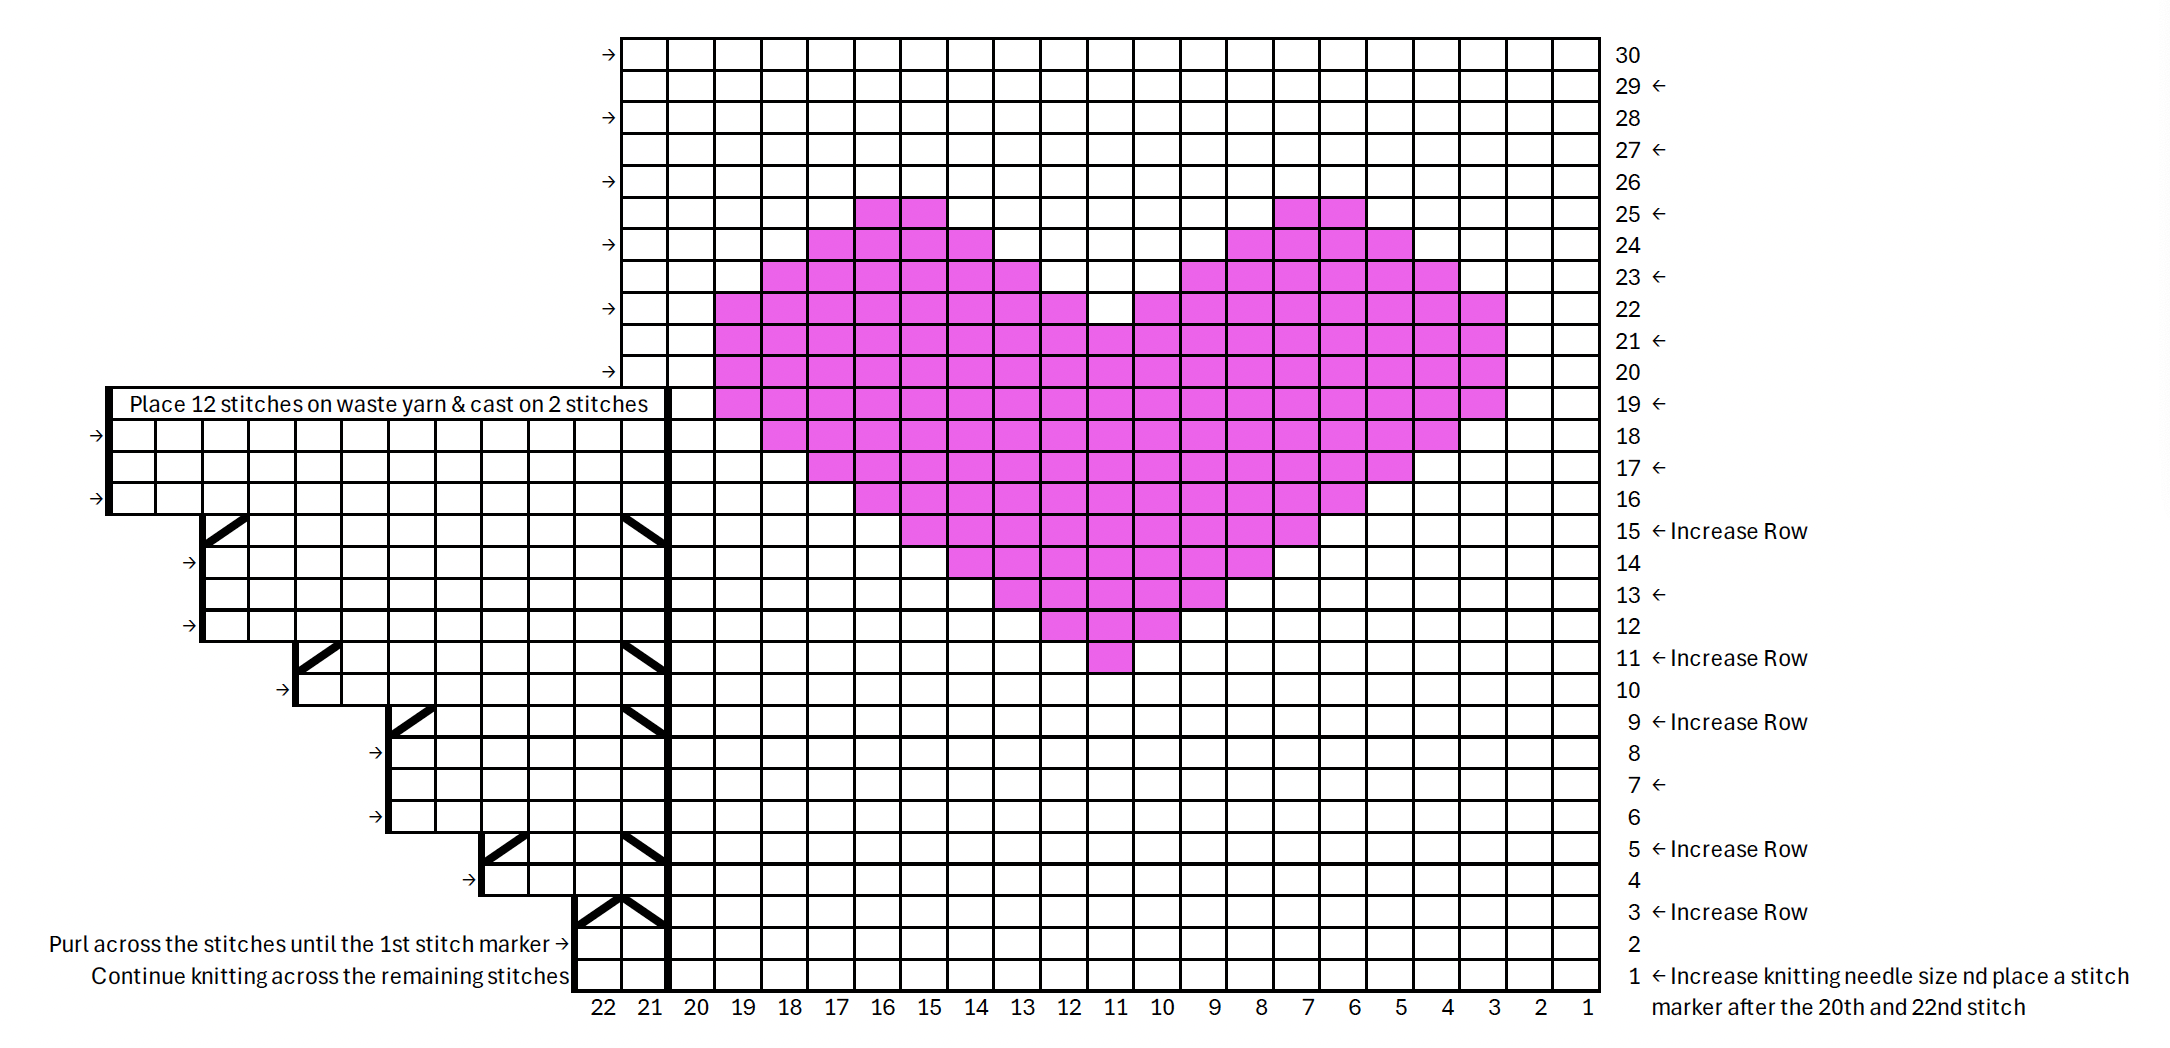
Left Chart
Work Rows 1 through 30 one time.
The chart labels where each thumb increase row should go. The written version of the increase row is described below.
Increase Row: Knit until the stitch marker, slip the stitch marker, M1L, knit until the stitch marker, M1R, slip the stitch marker, knit until the end of the row.
Ending Ribbing
Work the Ribbing Row 5 times.
Cast-off loosely in pattern.
Work the Thumb as described below.
Working the Right Mitten
Start by repeating the cast-on and ribbing steps as you worked for the left mitten.
Working the Right Chart
Two things to note before you begin the cable chart:
(1) The chart is worked in stockinette - Knit on right side (odd # rows), Purl on wrong side (even # rows)
(2) When working the first row of the cable chart, you will want to switch from your US 5 to US 6 knitting needles and place your two stitch markers to mark where the thumb will go.
Right Chart
Work Rows 1 through 30 one time.
The chart labels where each thumb increase row should go. The written version of the increase row is described below.
Increase Row: Knit until the stitch marker, slip the stitch marker, M1L, knit until the stitch marker, M1R, slip the stitch marker, knit until the end of the row.
Ending Ribbing
Work the Ribbing Row 5 times.
Cast-off loosely in pattern.
Work the Thumb as described below.
Thumb
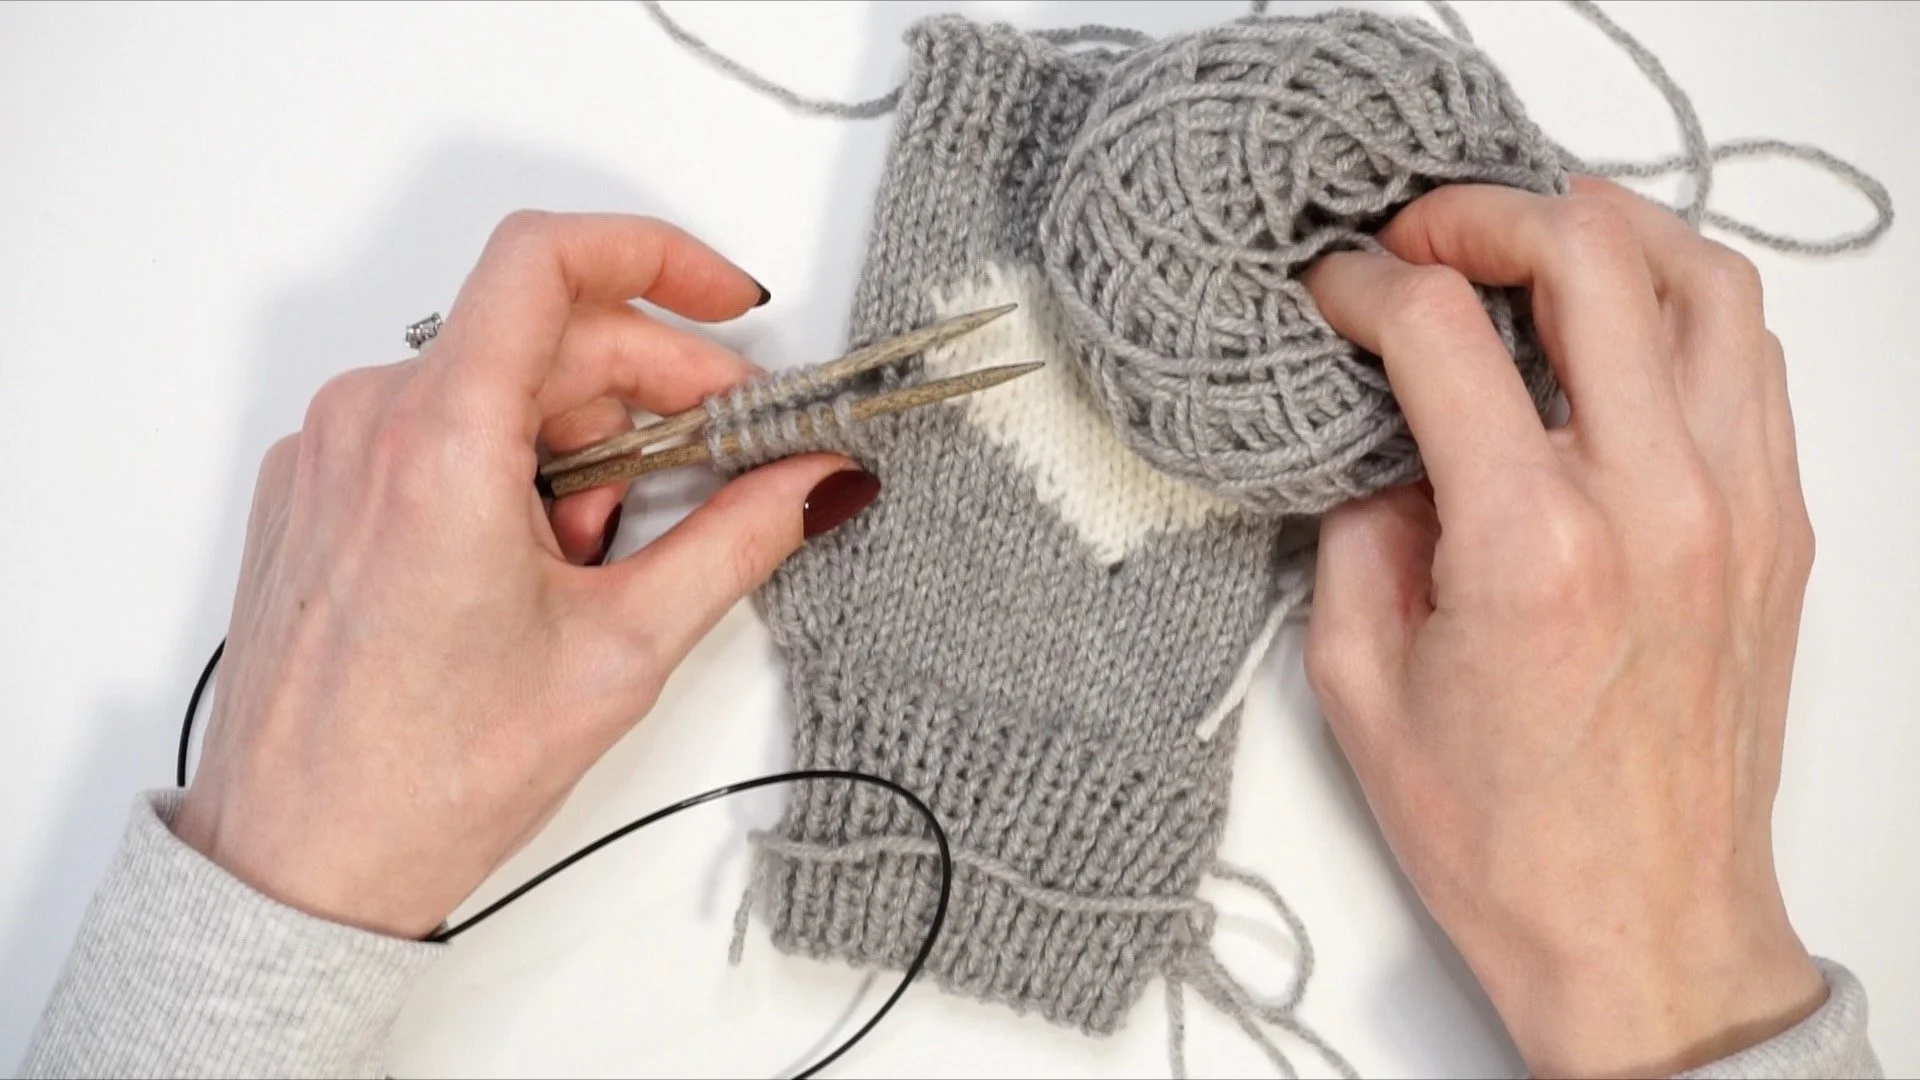
Place the mitten with the thumb pointed to the left. Using the US 6 circular knitting needle begin picking up the thumb stitches starting at the inner corner where the thumb meets the mitten. Pick up the first 6 stitches, then flip the mitten and pick up the next 6 stitches. When complete your stitches should be divided into 6 stitches on one knitting needle and 6 stitches on the other knitting needle to begin a magic loop round. See the photo to the right!
Join your main ball of the background color and knit the stitches that you have picked up. Also pick up and knit two stitches from the inner corner where the thumb meets the mitten. When you complete this first round you will have a total of 14 stitches for the thumb.
Knit 3 additional rounds.
Thumb Ribbing Round: *Knit 1, Purl 1* repeat between the *s across the round
Work the Thumb Ribbing Round a total of 3 times.
Cast-off loosely in pattern.
Left Mitten Chart
Right Mitten Chart
Key
Bobbin Guide